Projects Blog
Linux Kernel Cross-Compilation
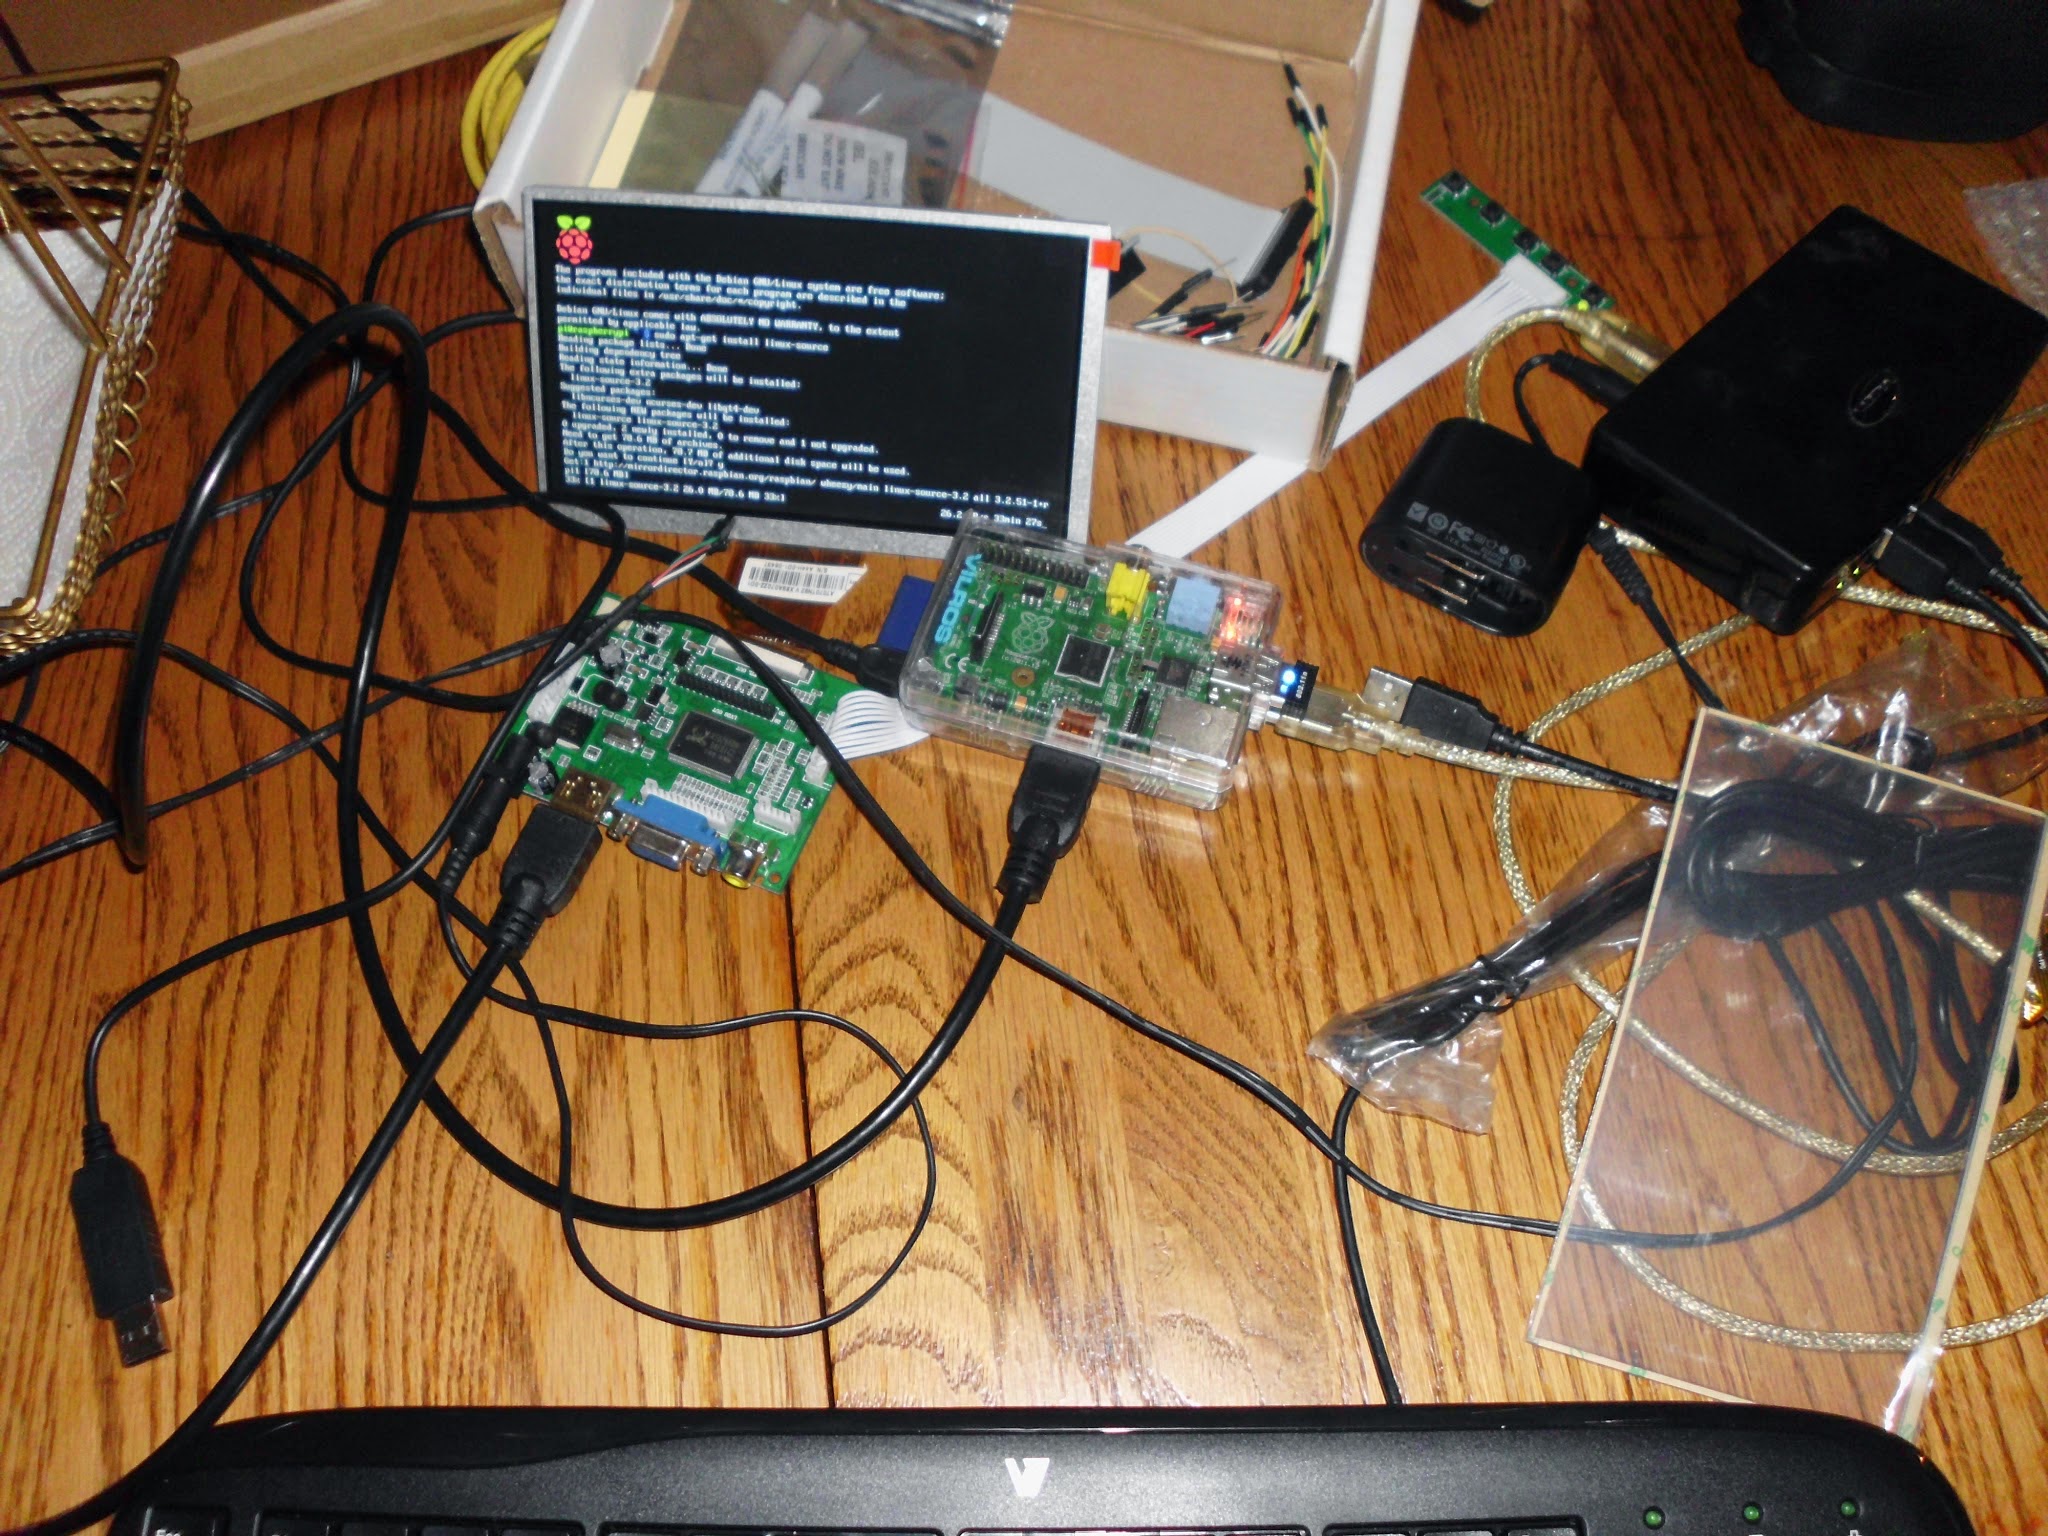


Raspberry Pi Tablet with Touchscreen Capabilities
I completed this some years ago. I originally put it on Google Pages or Google+, but this is now defunct. This was a compact tablet for my son, with basic games on the Raspberry Pi, with a 5" screen, and stylus. He enjoyed drawing on it the most as a toddler, but also enjoyed some of the more educational games it had to offer. Unfortunately, I lost that e-mail login and am unable to uncover the photos from that blog.
I had used an earlier distribution of Ubuntu to cross compile the kernel, to be able to provide touchscreen driver support. Otherwise, it was just a screen. This helped me dive more deep into Linux and its capabilities.
I utilized the CNC machine to encase the LCD and the rest of the device in acrylic, using DesignCAD 3D MAX to create models.
Programming and Scripting
Python Plugins
Aside from this website, I do enjoy learning more and more about programming. Check out my Github for work I published there.
I created a python script called "triplegeo.py", which is a plugin for a raspberry pi device that determines the geolocation of devices. It attempts to get coordinates via GPS (gpsd), then it will fall back to Google's geolocation API, and then it falls back to WiGLE's geolocation API. Then it does the data logged to a .jsonl file, creating content to send via webhook to a messaging platform. This also optionally uploads scan data to WiGLE. This is useful for wardriving, mapping, and archiving discoveries with context. This is a great tool for WiFi analysis. The entire messaging output includes SSID, BSSID, Client, Vendor, Signal, SNR, Channel, Frequency, Band, Encryption, Latitude, Longitude, Altitude(and from what source) Supported Rates, VendorTags, Timestamp, Vendor by OUI lookup, Device fingerprint and the associated .pcap file name to Discord.
The script also outputs a clean .gps.json file, which is compatible with other features and plugins built for the device.
"pcapmerger.py" I created this because I simply was not sure if .pcap files were being merged. This automatically merges validated .pcap files, upon discovering there is an internet connection. Either over OTG, or Bluetooth tethering.
This is a simple one:ble_wardrive.py. This simply scans on an interval, on its own loop. Meaning, it does not require an event to start scanning, just the device being turned on and the plugin enabled in config.toml. This is another one that will send messages to Discord via webhook if there is internet available. All it does, is scan what devices are around, reports Address, Vendor, RSSI, Type, whether or not it is a Mesh Network, Vulnerabilities, Anomalies, Rogue broadcast or not, Latitude, Longitude, Altitude, and from what location source it determines location, whether from GPS or Geo location API. Using Manufacturer Data, parsing a few bytes of transmitted information to help determine what the device is. It also utilizes IEEE OUI to attempt to determine also what vendor the bluetooth address is from.
In short, ble_wardrive.py continuously scans for devices, it extracts signal, service and manufacturer payloads, resolving MAC OUIs and BLE Company IDs using a local database, enriches this data with GPS coordinates, determines vulnerabilities, anomalies, and rogue behavior. Formatting all of this in a neat, clean message it sends over the internet for observation.
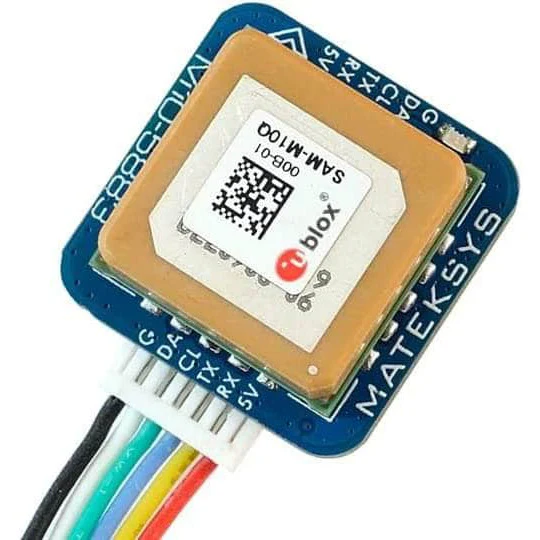
The hardware I added, pictured above with the RSSI scale, is a M10Q-5883 GPS. This has GPS/GLONASS/BeiDou support, providing a quick and accurate satellite lock. It includes a magnetometer for real-time heading, i2c interface, UART/SPI for NMEA output with its own onboard RTC.
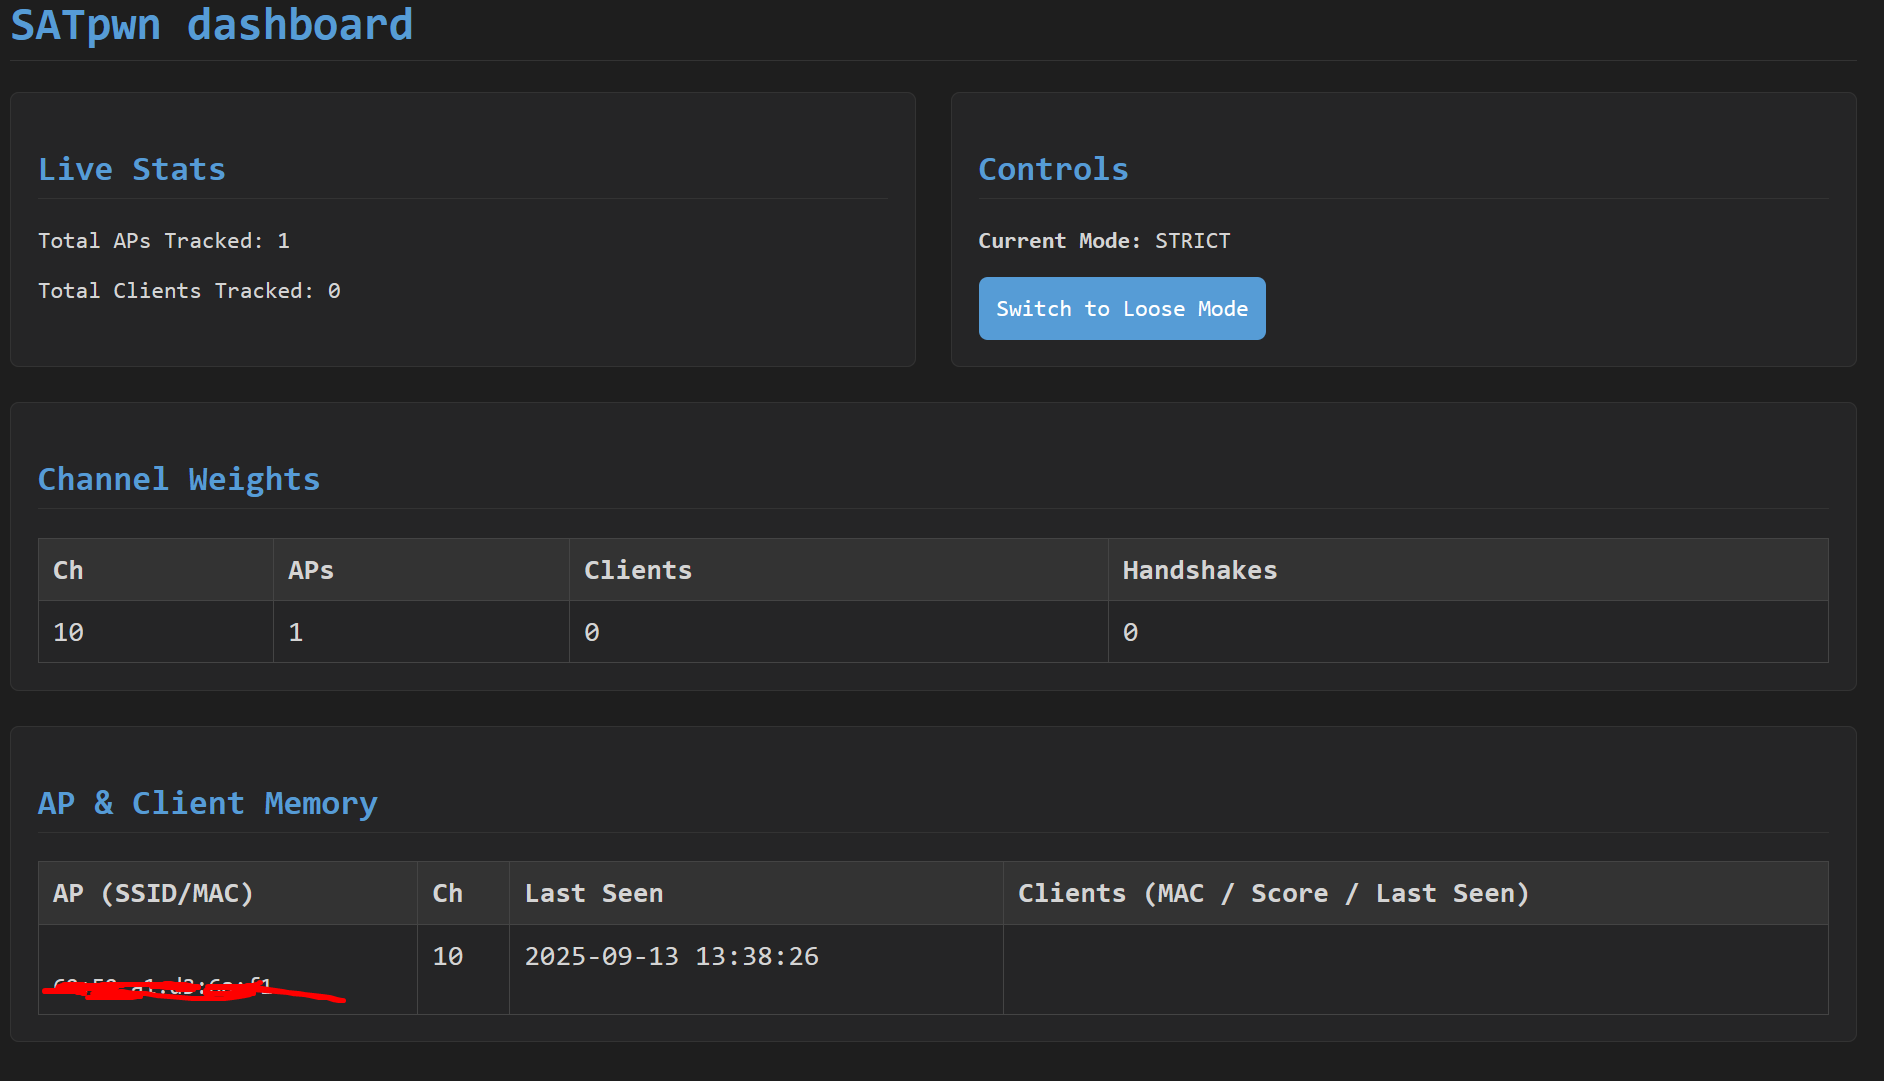
I had some folks reach out to me about some help. They wanted me to help them fix their plugin, so I accepted. The SATpwn plugin, short for Smart Auto-Tune is a one-of-a-kind plugin that replaces the existing decision making process with a more intelligent, adaptive algorithmic process. This focuses on efficient channel hopping and client selection. It features multiple modes to adapt to different environments. This features also to have the "Controls mode" function, write to a .json file periodically, and include logic where upon plugin ready, it reads the .json file and selects what mode you left off of for a more seamless experience. On the image below, on the left hand side, is a working example of the SATpwn script.
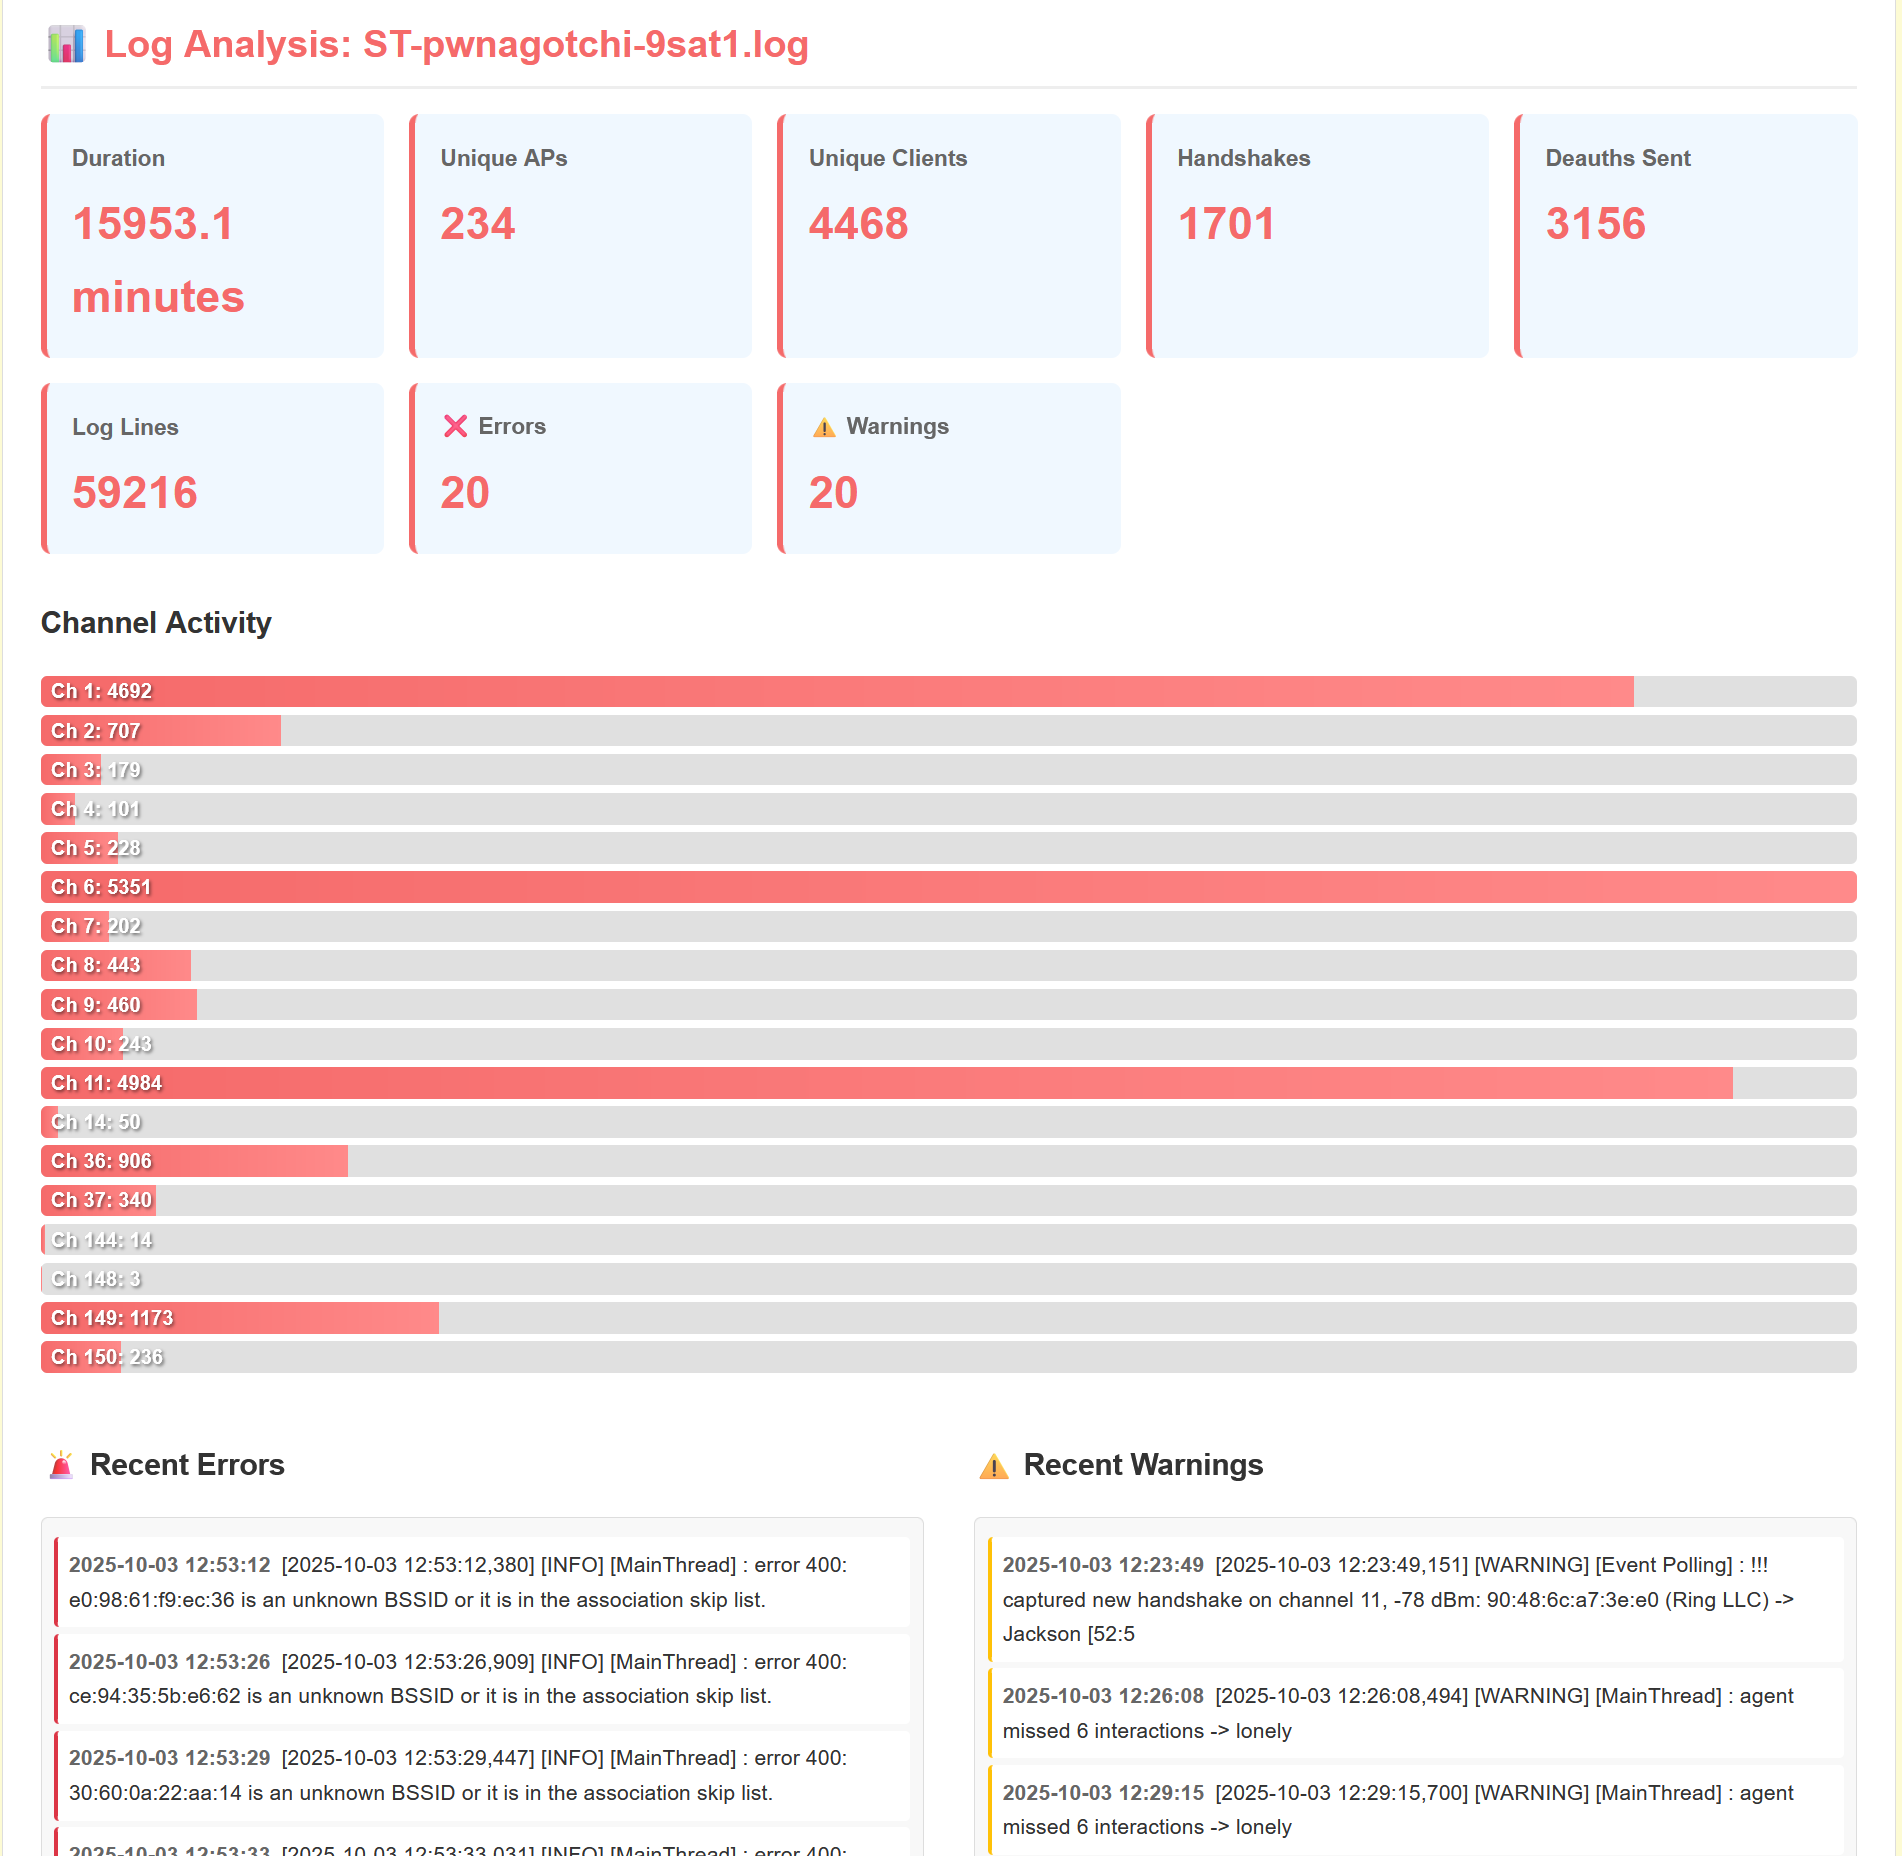
The image above, on the right hand side, is a quick, yet secure web application I made for my server and the other developers on the SATpwn project. This helps enumerate long logs, allows for secure uploads for debugging purposes and for helping understand the plugin further. This is all behind a secure login page written in JavaScript.
Python Scripts for PC
This is a Python script meant to be used with Windows OS, over Command Prompt. "HASHAUTO.py" This I created because I am trained in Cybersecurity, which I gained at my time subcontracting with NASA and providing technical support to various individuals and businesses. To help provide individuals or businesses with better internet and local security. This script in particular, streamlines the process of cracking WiFi networks. It optionally transfers handshake files from a Raspberry Pi to Windows via SCP. It then iterates through all the .2200 and .hc2200 files in a specified directory, from within the script. It tracks progress, but also prints out real-time feedback.
Updates to the Server
While I don't run enterprise-grade hardware at home, I operate my equipment following homelab best practices. Its primary use is a file server and web server. My current setup costs approximately $22 annually - including domain registration and electricity - compared to $120-$250 monthly for a Dell PowerEdge 7xx series server.
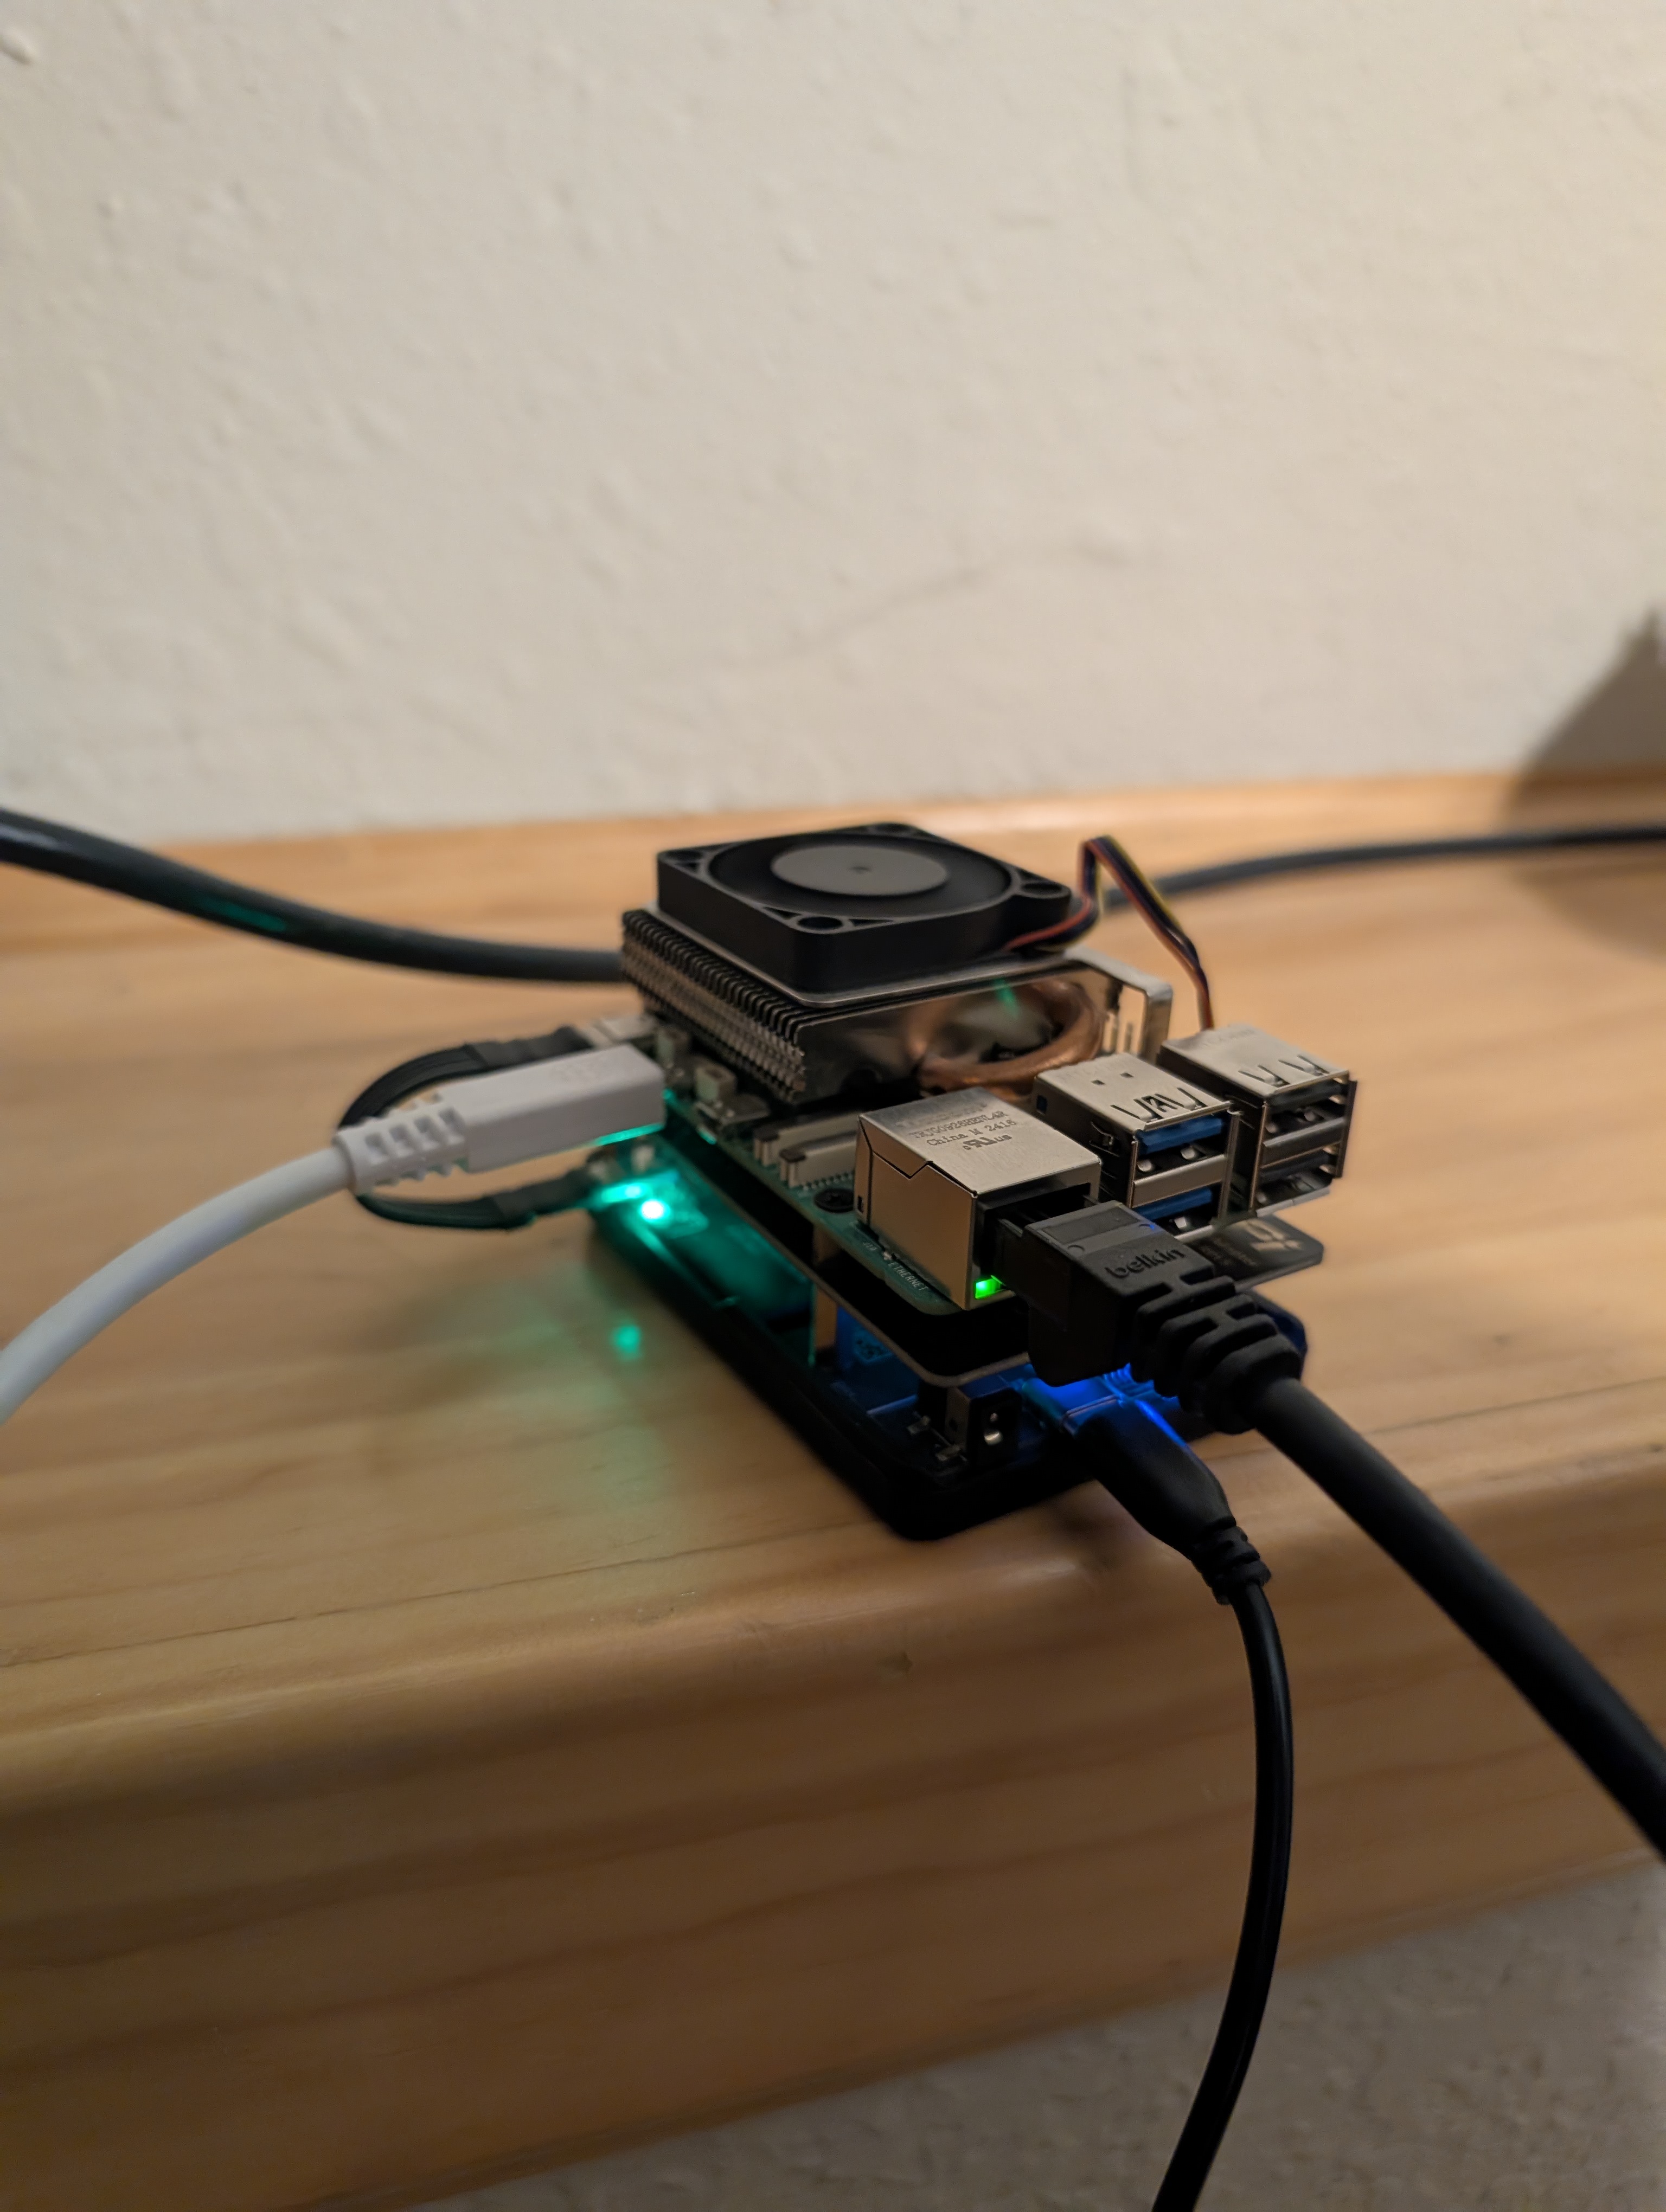
The server (pictured above) is a Raspberry Pi 5 with 8GB RAM, 1TB NVMe drive via PCIe HAT, and a PD Power HAT for automatic power recovery. Operating temperatures stay between 70-85°F while running multiple services. This replaced an older Raspberry Pi 3B and provides significantly better performance. Future upgrades include expanding network capacity from 1 Gbps to 2.5 Gbps, and utilizing Python to identify malware via Pi-hole Queries through alerts and automation more quickly.
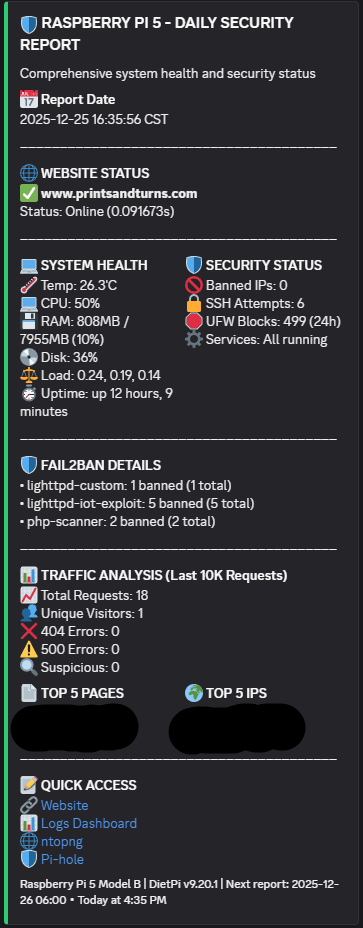
I've implemented automated service health monitoring for a web server, fail2ban, Pi-hole, ntopng, and Flask applications with crontab. The system sends webhook notifications for service status changes, fail2ban IP bans with jail information, and daily system statistics including CPU, RAM, disk usage, and temperature. Each day these reports are created, and logs are uploaded for security auditing.
The screenshot above shows a daily report notification. Recent bans were botnet scanners probing for vulnerabilities, which prompted additional security hardening. Running DietPi (Debian-based) provides extensive configuration options and familiarity with standard Linux tools. Python scripts are calling in cron, keeping it running.
Log Parser

In the other photo, you can see that it enumerates an access log for me, where I am able to see plainly how many requests, from what client, and along with what HTTP status code. This is especially helpful for network security.
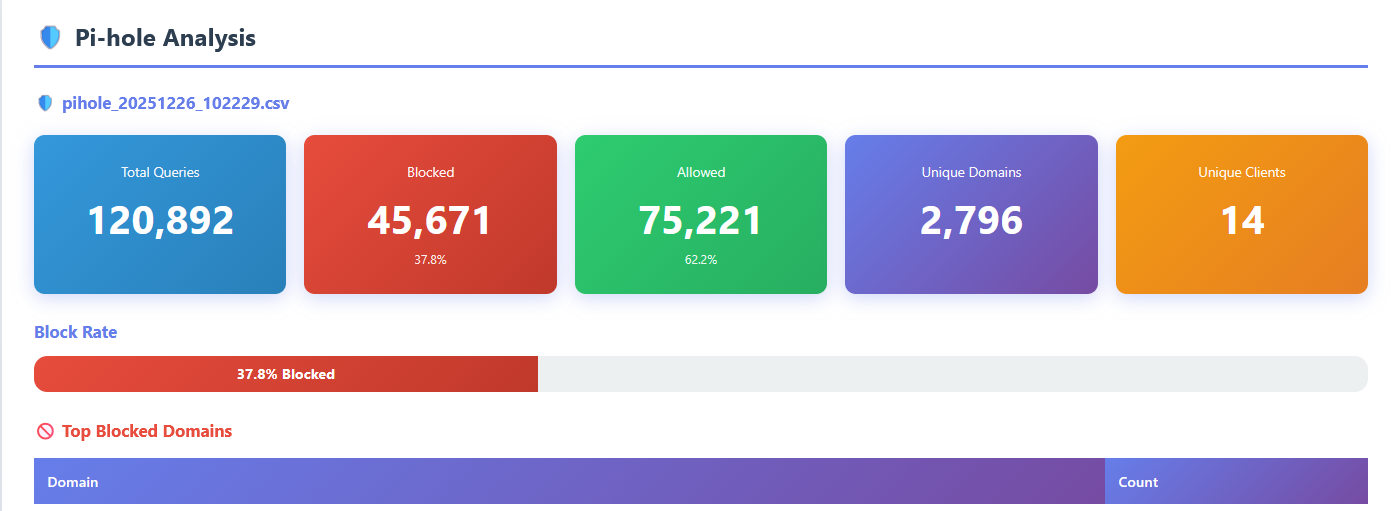
It is a Flask web application for log parsing from security monitoring tools, with built in protection (from being hosted on the internet and all). The app provides authenticated access to enumerated multiple log formats ranging from apache/ngix access logs, Pi-hole DNS query logs, and ntopng network flow data.
The application follows a RESTful API design with JWT-based authentication, serving as the backend API and frontend interface. There is role-based access control, file upload management, and parsers for the log formats. I use this tool in real-time to parse logs.
The authenication uses bcrypt hashing with JWT tokens. When a user submits credentials via the /api/auth/login endpoint, the server validates the password with the stored hash. If it is successful, it generates a JWT token.
Authentication endpoints in this script are
/api/auth/login for token generation and /api/auth/verify for validation. Using POST and then GET.
require_auth validates the token from the Authorization header from the API. This object, request.current_user retrieves the user information, and this is used continually to validate the session.SECRET_KEY is used for JWT signing. File uploads are limited to 24MB, with a character limit MAX_CONTENT_LENGTH.Upload directories are created with
os.makedirs with exist_ok=True.secure_filename from Werkzeug, sanitizes filenames. There are only some filetypes permitted.parse_apache_log_enhanced is a function which extracts information like source IP, timestamp, which HTTP request, status code, and response size.parse_pihole_csv function processes Pi-hole query logs that are in .CSV format. It uses Python's DictReader, mapping column header to dictionary keys for each row, labeling domain queries, client IP addresses, and block status codes. Pi-hole users status codes to indicate query status, providing a variety of information about a single query.parse_ntopng_json function helps read the data from ntopng. For each host on the LAN network, there is an amount of bytes sent and received. This helps display the total stats for the flow count, packet counts, and unique host counts.Below is a condensed example of the Flask parser API, it is not functioning, if you were thinking of copying this. ATTACK_PATTERNS is only based upon what I had seen in my own logs, botnet scanners and vulnerability probes that were hitting my server. This script below is very incomplete, and may evolve over time if and when new patterns emerge, especially the one I actually use. Thus far, PHP/WordPress scanning, config file enumeration, path traversal, XSS attempts, SQL injection, and Cisco VPN exploits.
from flask import Flask, request, jsonify
import jwt
import bcrypt
import os
from datetime import datetime, timedelta
import json
import csv
from werkzeug.utils import secure_filename
import re
from collections import Counter

app = Flask(__name__)
app.config['SECRET_KEY'] = os.environ.get('SECRET_KEY', 'change-in-production')
app.config['UPLOAD_FOLDER'] = './uploads'
app.config['MAX_CONTENT_LENGTH'] = 24 * 1024 * 1024

ALLOWED_EXTENSIONS = {'log', 'txt', 'json', 'csv', 'zip', 'pcap', 'cap'}

# Attack pattern detection
ATTACK_PATTERNS = [
    r'\.php[^/]*$',
    r'wp-admin|wp-content',
    r'\.env|\.git',
    r'\.\./|\.\.\\',
    r'<script|javascript:',
    r'union.*select',
]

LEGITIMATE_PATTERNS = [
    r'^/$',
    r'^/favicon\.ico',
    r'\.(css|js|png|jpg)$',
]

def authenticate_token(token):
    try:
        return jwt.decode(token, app.config['SECRET_KEY'], algorithms=['HS256'])
    except:
        return None

def require_auth(f):
    def decorated(*args, **kwargs):
        auth_header = request.headers.get('Authorization')
        if not auth_header:
            return jsonify({'error': 'Token required'}), 401
        token = auth_header.split(' ')[1]
        payload = authenticate_token(token)
        if not payload:
            return jsonify({'error': 'Invalid token'}), 401
        request.current_user = payload
        return f(*args, **kwargs)
    decorated.__name__ = f.__name__
    return decorated

def is_attack_request(path, user_agent):
    for pattern in LEGITIMATE_PATTERNS:
        if re.search(pattern, path, re.IGNORECASE):
            return False
    for pattern in ATTACK_PATTERNS:
        if re.search(pattern, path, re.IGNORECASE):
            return True
    return False

def parse_apache_log_enhanced(filepath):
    pattern = r'^(\S+)\s+\S+\s+-\s+\[([^\]]+)\]\s+"([^"]+)"\s+(\d+)\s+(\d+)'
    stats = {
        'total_requests': 0,
        'attack_requests': 0,
        'unique_ips': 0,
        'attacker_ips': [],
        'status_codes': {},
        'top_paths': [],
    }

    ip_counter = Counter()
    attacker_ips = Counter()
    path_counter = Counter()

    with open(filepath, 'r', errors='ignore') as f:
        for line in f:
            match = re.match(pattern, line)
            if not match:
                continue

            source_ip, timestamp, request, status, size = match.groups()
            req_parts = request.split()
            path = req_parts[1] if len(req_parts) > 1 else ''
            user_agent = line.split('"')[-2] if '"' in line else ''

            stats['total_requests'] += 1
            ip_counter[source_ip] += 1
            path_counter[path] += 1

            if is_attack_request(path, user_agent):
                stats['attack_requests'] += 1
                attacker_ips[source_ip] += 1

    stats['unique_ips'] = len(ip_counter)
    stats['attacker_ips'] = [{'ip': ip, 'count': c} for ip, c in attacker_ips.most_common(10)]
    stats['top_paths'] = [{'path': p, 'count': c} for p, c in path_counter.most_common(20)]

    return stats

def parse_pihole_csv(filepath):
    stats = {'total_queries': 0, 'blocked_queries': 0, 'top_domains': []}
    top_domains = Counter()

    with open(filepath, 'r', errors='ignore') as f:
        reader = csv.DictReader(f)
        for row in reader:
            stats['total_queries'] += 1
            domain = row.get('domain', '').strip()
            status = row.get('status', '0').strip()

            if domain:
                top_domains[domain] += 1
            if status in ['1', '4', '5', '6', '7', '8']:
                stats['blocked_queries'] += 1

    stats['top_domains'] = [{'domain': d, 'count': c} for d, c in top_domains.most_common(20)]
    return stats

def parse_pwnagotchi_log(filepath):
    stats = {'handshakes': 0, 'unique_aps': 0, 'deauths_sent': 0}
    aps_set = set()

    with open(filepath, 'r', errors='ignore') as f:
        for line in f:
            if 'handshake' in line.lower():
                stats['handshakes'] += 1
                mac = re.search(r'([0-9a-fA-F]{2}[:-]){5}[0-9a-fA-F]{2}', line)
                if mac:
                    aps_set.add(mac.group())
            if 'deauth' in line.lower():
                stats['deauths_sent'] += 1

    stats['unique_aps'] = len(aps_set)
    return stats

@app.route('/api/auth/login', methods=['POST'])
def login():
    data = request.get_json()
    username = data.get('username')
    password = data.get('password')

    # Verify credentials (bcrypt hash check)
    if verify_user(username, password):
        token = jwt.encode({
            'username': username,
            'exp': datetime.utcnow() + timedelta(hours=8)
        }, app.config['SECRET_KEY'], algorithm='HS256')
        return jsonify({'token': token})
    return jsonify({'error': 'Invalid credentials'}), 401

@app.route('/api/upload', methods=['POST'])
@require_auth
def upload():
    if 'file' not in request.files:
        return jsonify({'error': 'No file'}), 400

    file = request.files['file']
    filename = secure_filename(file.filename)
    filepath = os.path.join(app.config['UPLOAD_FOLDER'], filename)
    file.save(filepath)

    return jsonify({'success': True, 'filename': filename})

@app.route('/api/analyze', methods=['GET'])
@require_auth
def analyze():
    filename = request.args.get('file')
    filepath = os.path.join(app.config['UPLOAD_FOLDER'], filename)

    if filename.endswith('.csv'):
        return jsonify(parse_pihole_csv(filepath))
    elif 'pwnagotchi' in filename.lower():
        return jsonify(parse_pwnagotchi_log(filepath))
    else:
        return jsonify(parse_apache_log_enhanced(filepath))

if __name__ == '__main__':
    app.run(host='0.0.0.0', port=5001)
But wait, there's more...
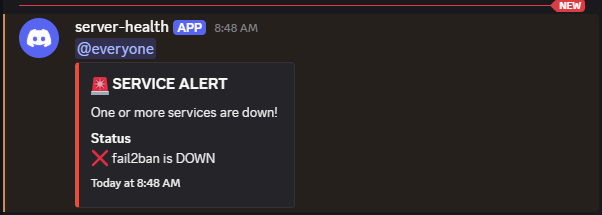
There is another app running constantly that watches the logs and that is called fail2ban. This is configured with what is called custom jails that detect IoT exploit attempts, SQL injection patterns, and path traversal attacks. When activity is detected by fail2ban, it automatically creates firewall rules to block the IP address where that activity originates from. There are discord notifications whenever there is an IP address banned.
I created a bash-based system that runs cron twice daily. It has three modes, daily, monitor (for continuous checking) and test to verify webhook connectivity.
Custom Banner
I customized the login banner that displays when I SSH into the server. DietPi usually just displays live information when you login, but I've included a command cheat sheet I am able to easily reference. I included things like uptime, top processes using CPU and RAM, but also quick reference to commands of all the tools I mentioned above.
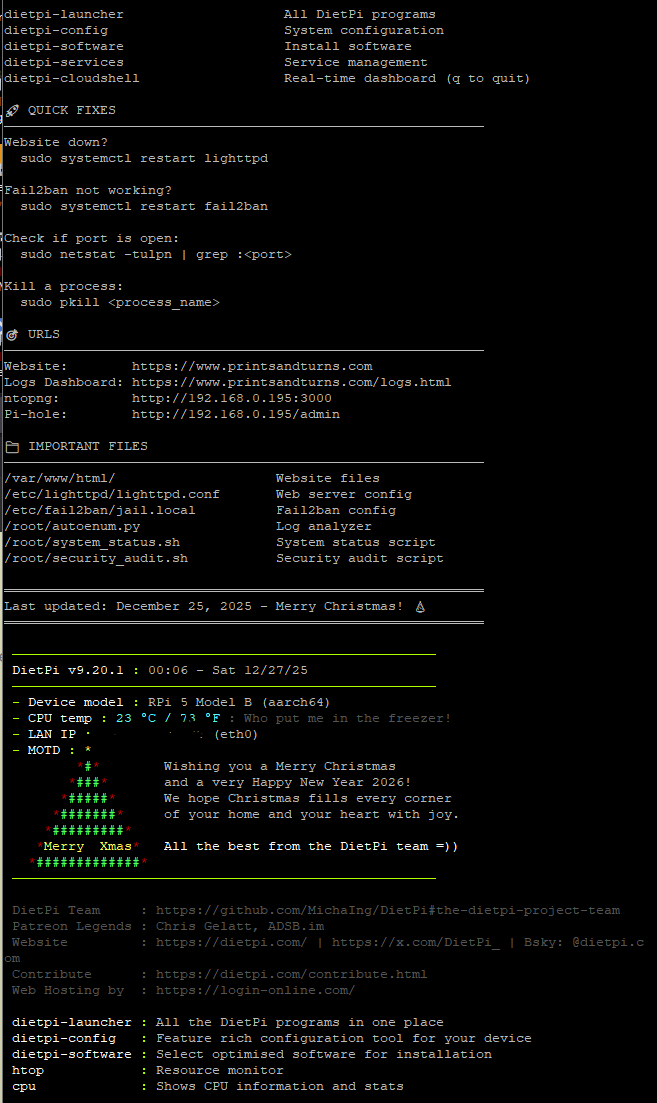
There is a Christmas tree written by the DietPi devs with their seasons greetings, with device model, temperature, and IP. I added the custom banner because while I thought the fish app for the command line was great with the memory, this gives me an immediate reminder, which saves me from having to use a post-it note.
Since I've written this, I actually had migrated away from using Discord for notifications, and installed an instance of ntfy. This tightens up security a little bit, though it was a webhook into a private space, it went through Discord's servers, into a Discord server. Ntfy has no rate limits, I can send thousands of notifications if I wanted to from my server. It is self-hosted, on my own hardware. This way all my data will stay on the local network, which is great for sensitive data. I can utilize the VPN tunnel I had setup if I need to view information remotely.
Pi-Hole with Unbound Recursive DNS
The server runs also as my DNS server with Unbound being the recursive DNS resolver. Instead of forwarding DNS queries to Google, Cloudflare or your ISP, Unbound queries authoritative nameservers directly. This eliminates third-party DNS providers seeing every domain I visit while giving me complete control over DNSSEC validation.
The setup on DietPi involved installing Unbound via sudo apt install unbound, then configuring it to listen on port 5335 to avoid conflicts with Pi-hole's FTL daemon on port 53. I edited /etc/unbound/unbound.conf.d/pi-hole.conf to set the interface to 127.0.0.1, enable DNSSEC validation, and configure appropriate cache settings for the Raspberry Pi's 8GB RAM. In Pi-hole's web interface under Settings → DNS, I removed all upstream DNS servers (Google, Cloudflare, etc.) and set only 127.0.0.1#5335 as the custom upstream DNS server.
This means every DNS query follows this path: Device → Pi-hole (ad/tracker filtering on port 53) → Unbound (recursive resolution on port 5335) → Root servers → Authoritative nameservers → Response back through the chain. Initial queries for brand-new domains take 50-200ms longer since Unbound must traverse the DNS hierarchy, but subsequent queries are cached and respond in under 5ms. The privacy gain is substantial - no external DNS provider logs my browsing habits.
UFW Firewall Configuration (The Hard Lesson)
After enabling ufw with sudo ufw enable, my entire network went down - devices couldn't get DHCP leases, and DNS stopped resolving. UFW's default policy is deny-all incoming traffic, which blocked Pi-hole's critical services even though the daemon was running fine.
At the physical terminal of the Pi, I had to open the necessary ports manually. Pi-hole needs UDP port 53 for DNS queries, UDP ports 67-68 for DHCP server/client communication, and TCP ports 80/443 for the web admin interface. I ran sudo ufw allow 53/udp, sudo ufw allow 67:68/udp, and sudo ufw allow 80,443/tcp to restore basic functionality. For ntopng's web interface on port 3000, I used sudo ufw allow from 192.168.0.0/16 to any port 3000 to restrict access to only local network devices.
The critical ports I keep open are: 22 (SSH - later moved to 2222), 53 (DNS), 67-68 (DHCP), 80/443 (web servers), 3000 (ntopng), 3001 (ntopng alternate), 5001 (Flask log dashboard - local only), and 51820 (WireGuard VPN). Everything else is blocked by default. I use sudo ufw status verbose to check active rules and sudo ufw delete allow to remove rules I no longer need. The firewall integrates with fail2ban - when fail2ban detects malicious activity, it dynamically adds UFW rules to block offending IPs across all ports.
Running sudo ufw reload applies changes without dropping active connections, but I learned to always have physical access to the Pi before making UFW changes. One wrong rule and you're locked out remotely. The combination of Pi-hole filtering ads/trackers at the DNS level, Unbound providing privacy-focused recursive resolution, and UFW blocking unwanted traffic creates great network security without relying on third-party services, for very affordable prices.
Local AI
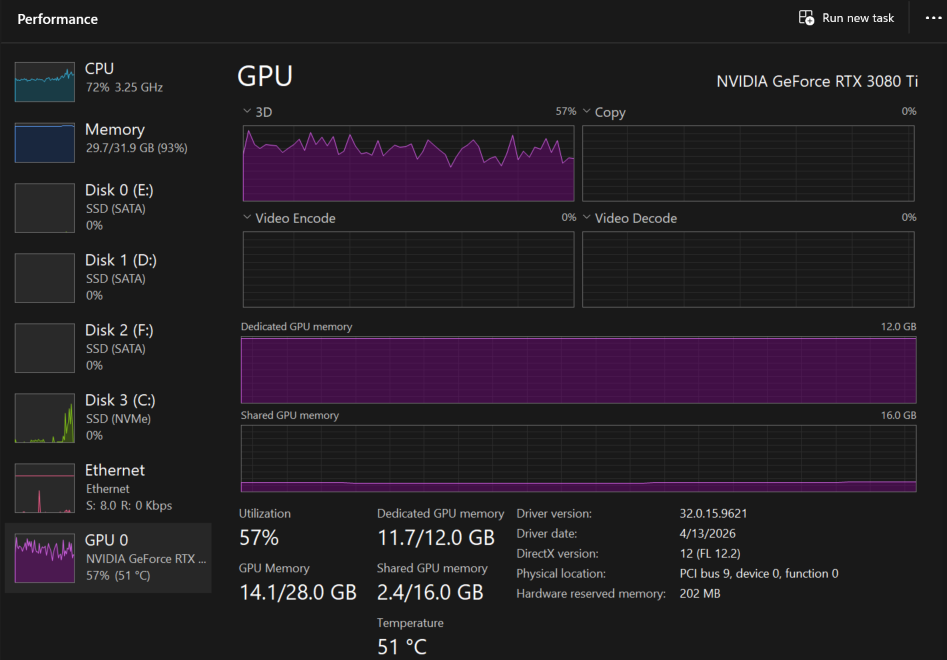
On a system featuring a 5800X3D CPU, 32GB of system RAM, and an RTX 3080 Ti 12GB GPU, I ran extensive benchmarks across various local model architectures (including Qwen3, Qwen3.5, OmniCoder, ranging from 1.7B to 27B parameters) using quantizations like Q6_K, Q4_K, IQ2_S, and IQ3_XS. While smaller dense models offload completely to VRAM, they quickly run out of steam on complex technical reasoning. I ultimately found a remarkable performance breakthrough by running a customized Qwen 3.6 35B A3B Mixture-of-Experts (MoE) model. While testing it as a heavier Q4_K_M split configuration yielded excellent answers, it severely choked generation speeds due to heavy system memory spilling. The true "sweet spot" emerged when stepping down to an imatrix-optimized IQ2_M quantization paired with an aggressive 4-bit KV cache architecture.
For the backend infrastructure, I settled on the native command-line llama-server using Hermes as the agent harness. This ultra-lightweight pairing minimizes host resource overhead, leaving plenty of system headroom for regular desktop tasks during active inference. Crucially, a properly configured Hermes deployment allows safe API access from virtually anywhere across the local network, serving as a private, high-performance, zero-subscription alternative to cloud-based AI ecosystems. The up-front hardware cost effectively pays for itself within 6 to 8 months compared to premium enterprise subscriptions—all running locally on a mature, previous-generation graphics card.
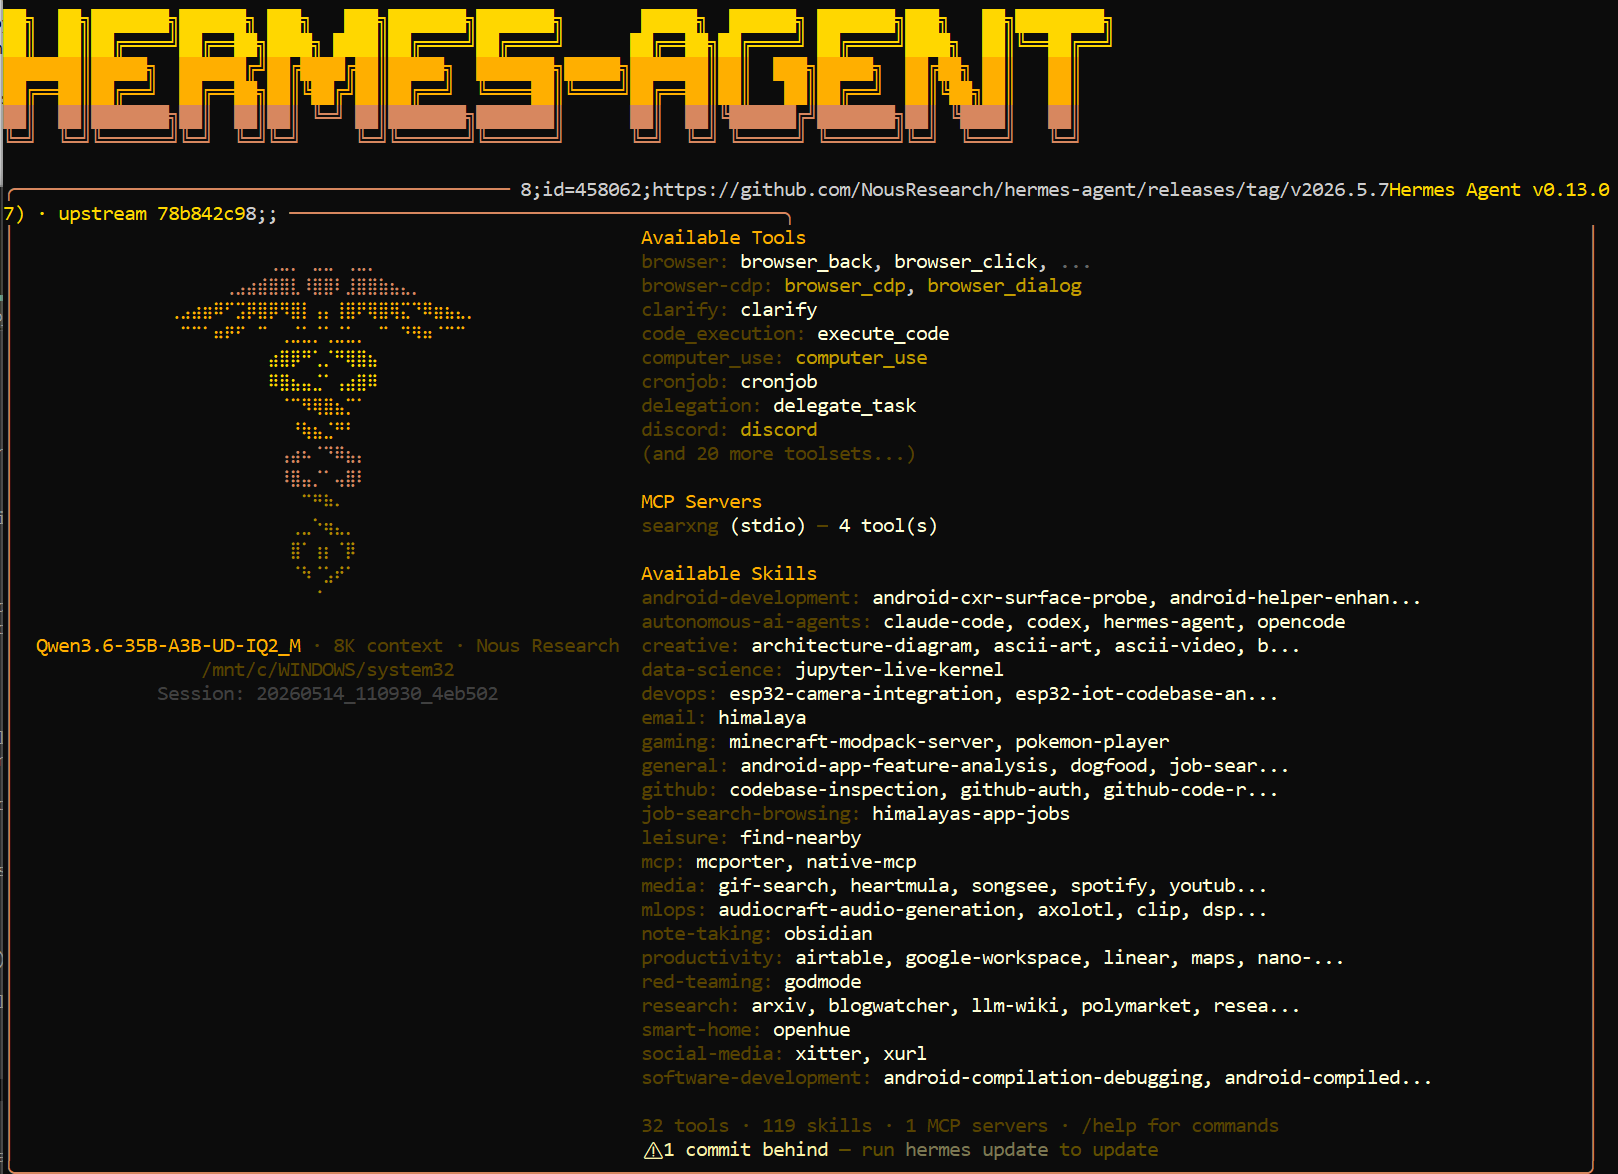
Local token context limits are tightly bound to VRAM constraints, but sparse activation models change the rules. Because an MoE architecture only routes execution through a fraction of its parameters per token (~3B active parameters), the performance penalty of spilling un-offloaded layers into system RAM over the PCIe bus is dramatically lower than that of a traditional dense model. When this sparse routing is paired with advanced KV cache compression, a massive 65K token window becomes completely viable on consumer silicon. The system remains highly responsive without exceeding the physical 12GB VRAM buffer. The underlying model can scale all the way up to its native 262k training ceiling, though deep context evaluation requires a degree of patience as processing timelines scale out.
While ultra-low bit rate quants and 4-bit token compression (like turbo4) introduce minor precision trade-offs compared to heavy f16 or q8_0 structures, the massive gains in memory efficiency and execution speed make it an incredibly pragmatic compromise. Below is a realistic breakdown of how different configurations handle sustained contextual loads between 40% and 90% capacity.
As a side project, my son and I are currently using a lightweight Gemma-4-E4B (Q8_K_P) model to drive real-time, context-aware character animations inside an active game environment. While Gemma excels remarkably at creative writing and low-latency interaction, Qwen 3.6 is the undisputed choice for heavy technical and programmatic workflows.
LLM Benchmark Results
Local inference configs — llama.cpp on RTX 3080 Ti + 5800X3D. Benchmarks captured under approximately 40–75% contextual load, using Hermes, except for the 9b benched with WebUI. Smaller models maintain deep context windows natively, while the 35B configurations leverage context checkpointing to preserve VRAM.
| Model | Quant | Context | KV Cache | Model Buffer (VRAM) | Batch / UBatch | GPU Layers | Prompt Speed | Decode Speed | Notes |
|---|---|---|---|---|---|---|---|---|---|
| Gemma-4-E4BFast | Q8_K_P | 65,536 | q8_0 / q8_0 |
~3,100 MiB | 4,096 / 512 | All (GpuLayers = 99) | 2,819.12 tok/s | 78.98 tok/s | Delivers exceptional prefill and generation throughput. Because the entire lightweight weight graph fits cleanly into VRAM with an uncompressed cache, it completely avoids system memory bus bottlenecks. |
| Qwen3.5-9BFull GPU Fit | Q8_0 | 65,536 | q8_0 / q8_0 |
~8,400 MiB | 2,048 / 1,024 | All | 1,554.15 tok/s (0.64 ms/tok) |
41.84 tok/s (23.90 ms/tok) |
Weights and an uncompressed 8-bit KV cache fit fully into the 12GB frame buffer. Compute graphs execute natively on-chip, providing highly stable, high-throughput generation across deep context windows. |
| Qwen3.5-9BContext Hog | Q6_K | 131,072 | q8_0 / q8_0 |
~6,212 MiB (+4,402 MiB KV) |
1,152 / 192 | All | 376.54 – 4,266.67 tok/s (2.66 ms/tok avg) |
35.32 – 36.29 tok/s (~27.80 ms/tok) |
Achieves a 0.999 LCP similarity cache reuse threshold to completely bypass re-evaluation overhead during ongoing sessions. Memory is strictly locked to a maximum of 32 static checkpoints (~50.25 MiB per slice). Dropping the execution pipeline to a 192 micro-batch optimizes VRAM L2 cache usage, allowing the system to sustain rapid 0.27 ms/tok prefill bursts before averaging out to 2.66 ms/tok at extreme 80k token depths. |
| Qwen3.5-9BWebUI | Q8_0 | 131,072 | q8_0 / q8_0 |
~8,400 MiB (+4,402 MiB KV) |
1,152 / 192 | All | 1,190.71 – 2,193.89 tok/s (0.59 ms/tok avg) |
42.26 – 55.97 tok/s (~22.04 ms/tok avg) |
Demonstrates robust generation through the WebUI. The wide variance in prompt speed is driven by highly effective KV cache reuse in later interactions (caching up to 74k tokens), completely bypassing prefill bottlenecks and allowing decode speeds to peak near 56 tok/s. |
| Qwen3.6-35B-A3BHeavy Thinker | Q4_K_M | 65,536 | q8_0 / q8_0 |
Partial (Split) | 512 / 512 | 18 / 41 Layers | 58.74 – 84.43 tok/s | 3.94 – 5.66 tok/s (176.59 ms/tok) |
A hybrid CPU/GPU split configuration using uncompressed context caches. Generation speed is strictly limited by the system RAM bandwidth required to compute the offloaded layers on the host CPU. |
| Qwen3.6-35B-A3BVRAM Optimized | IQ2_M (~2.69 BPW) | 65,536 | turbo4 / turbo4 |
9,504 MiB | 512 / 512 | 36 / 41 Layers | 172.04 tok/s (Delta Prefill) |
31.87 tok/s (Continuous Decode) |
An exceptional low-VRAM sweet spot, running a flagship 35B MoE model on a 12GB frame buffer with a 1.5 GB safety cushion. By pairing an imatrix-optimized IQ2_M quant with a 4-bit turbo4 KV cache, it minimizes the precision degradation historically seen in sub-3 BPW weights. Synchronizing execution to a uniform 512-token chunk pipeline completely eliminates transient prefill allocation spikes, enabling rapid sub-550ms LCP context recall and stable generation. |
| Qwen3.6-27BSystem Bound | IQ3_XS | 65,536 | q8_0 / q8_0 |
Partial (Split) | 4,096 / 1,024 | 12 / 32 Layers | ~24.50 tok/s | 1.45 – 3.23 tok/s | Because this dense model spills heavily into system memory, every token generation pass requires reading massive weight tensors over the PCIe bus. Without the sparse activation advantages of an MoE architecture, execution is severely bound by system RAM speeds. |
While ultra-low bit rates traditionally suffer from severe coherence loss, this specific configuration leverages an importance matrix (imatrix) calibration alongside a 35B Mixture-of-Experts architecture (routing only ~3B active parameters per token). This structure bridges the gap between footprint and intelligence. However, there generally is a more high rate of error at more high context especially when you are short of VRAM (This is your coherence loss). By offloading 36 layers and unifying the logical/physical processing boundaries (-b 512 / -ub 512), the system runs massive context depths safely within consumer hardware limitations, bypassing the otherwise normal OOM crashes of 9B+ architectures on single 12GB cards.